Adding & Managing Events
Create and configure matchday or event records before sending any parking invitations.
Log in to the Park Me Up admin dashboard. In the left-hand navigation, click Events. You will see a list of all upcoming and past events for your venue.
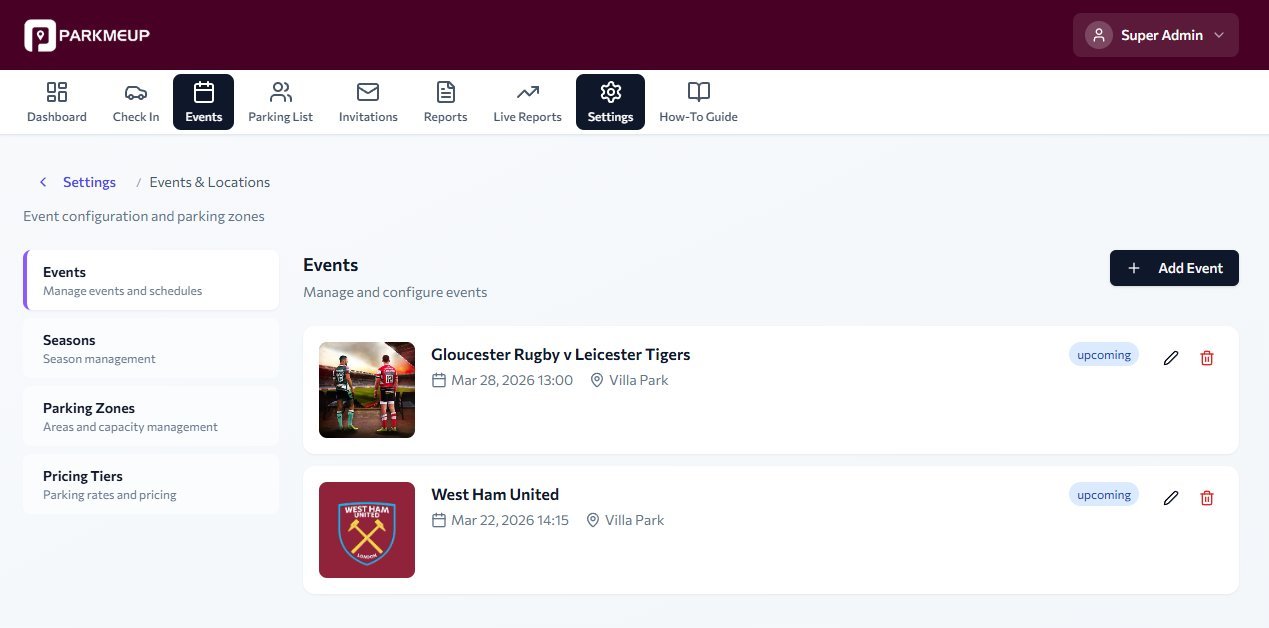
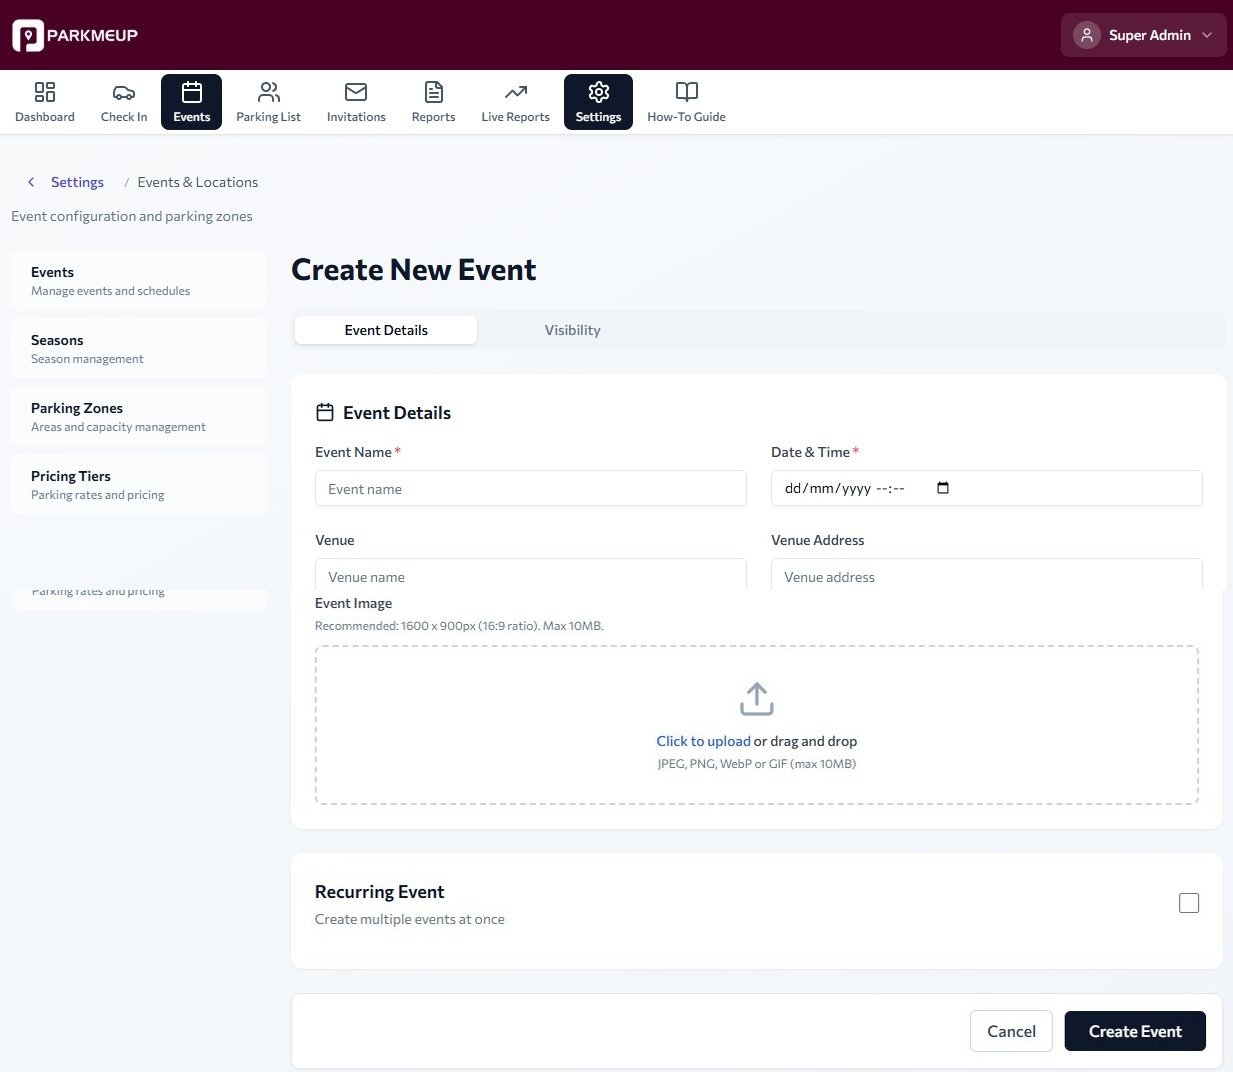
Click the + Add Event button in the top-right corner. A form will appear asking for the following details:
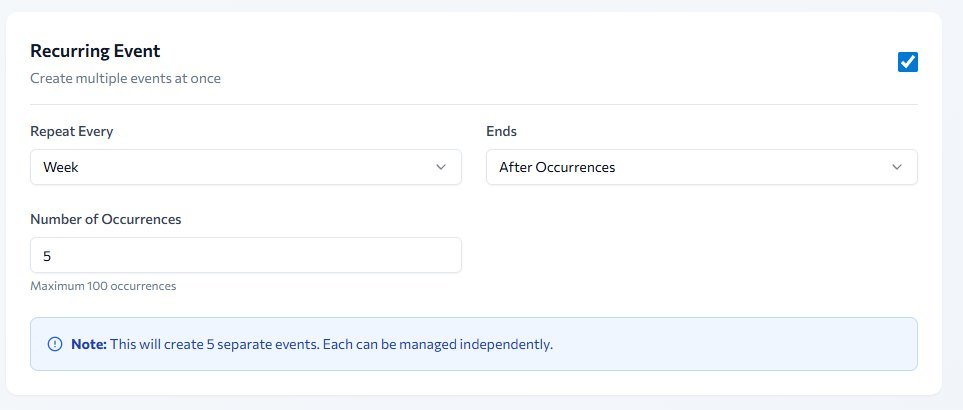
Recurring events: Tick the Recurring Event checkbox to create a series of events in one go. Set the repeat frequency (e.g. weekly), the end condition (after a set number of occurrences), and the number of occurrences (up to 100). Each event in the series is created independently and can be managed, edited, or cancelled separately.
Click Save Event. The event will appear in the Events list with a status of Draft. It will remain in Draft until you begin sending invitations, at which point its status changes to Active.
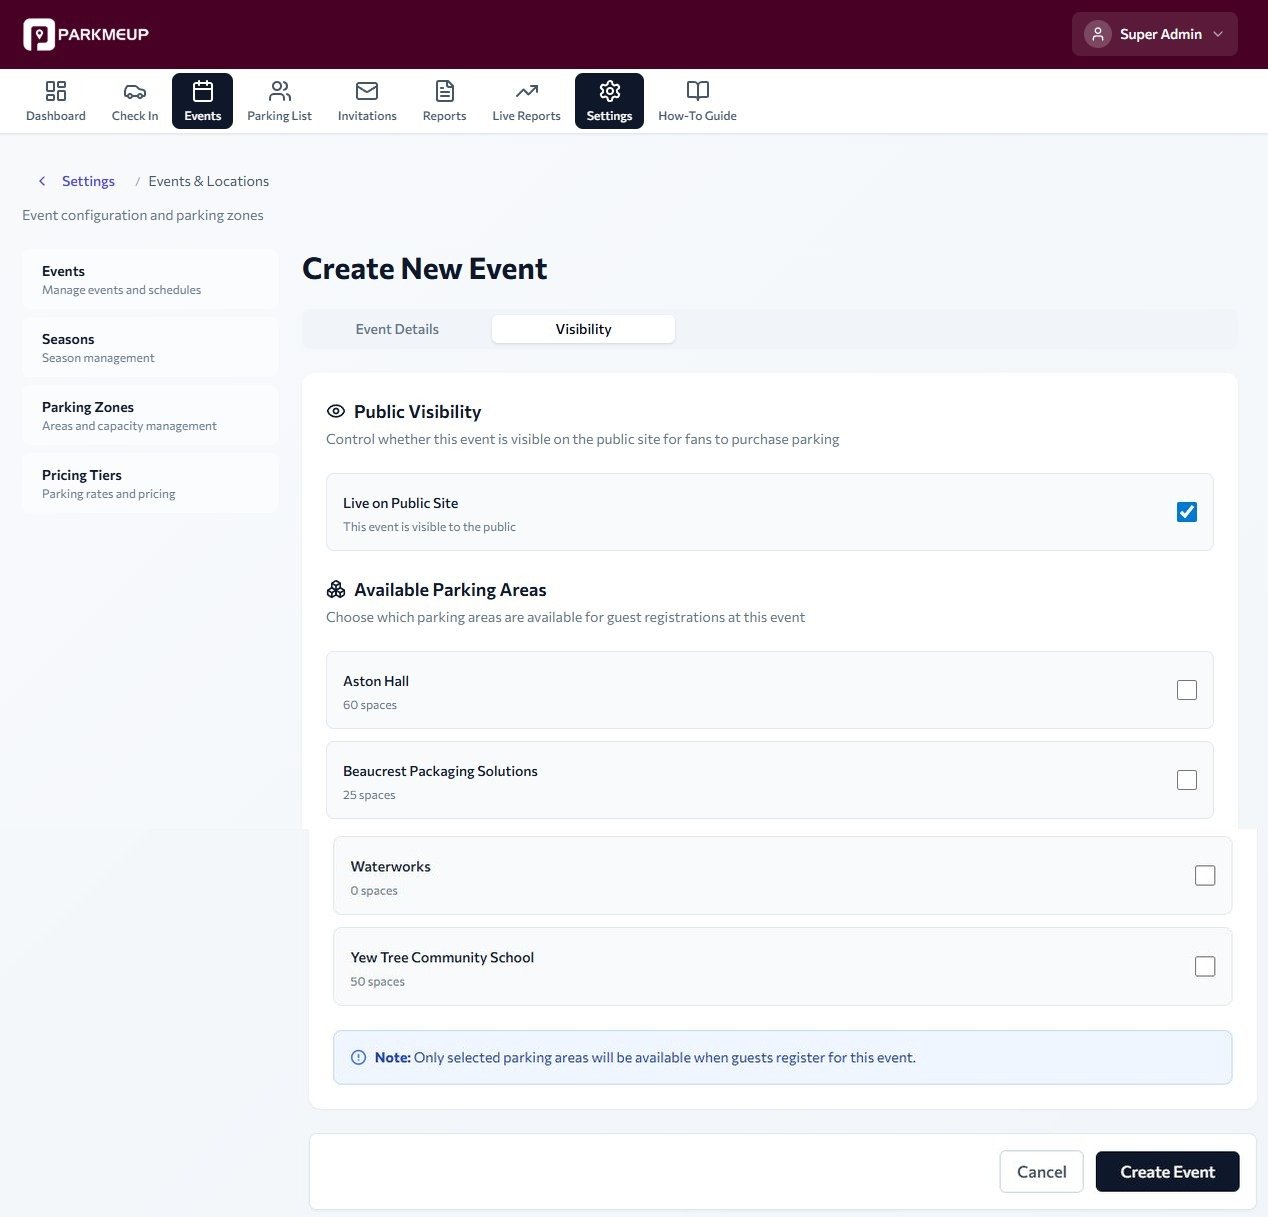
Click the Visibility tab to configure two settings before saving the event:
To save time for recurring matchdays, open an existing event and click Clone Event. A duplicate is created with all settings copied — simply update the date and event name. This is especially useful when parking zones and capacity remain the same across multiple fixtures.
Past events are automatically moved to the Archived tab after the event date. To manually archive an event early, open it and select Archive Event from the options menu. Archived events are read-only and retain all registration and check-in history for reporting purposes.
Bulk Uploading Registrations
Import a list of parking registrations from a CSV file rather than adding them one by one.
Before uploading, ensure your spreadsheet is saved as a .csv file and contains at minimum the following columns. Column names are not case-sensitive, but must match the accepted headers:
| Column | Required? | Example Value | Notes |
|---|---|---|---|
first_name | Required | James | Pass holder first name |
last_name | Required | Smith | Pass holder surname |
email | Required | [email protected] | Used to send the invitation |
phone | Optional | 07700900123 | Required for WhatsApp delivery |
vehicle_reg | Optional | AB12 CDE | Leave blank for delegate passes |
parking_zone | Optional | Zone A | Overrides the event default zone |
vehicle_reg blank. They will be prompted to enter their plate when they receive their invitation link.Open the event you want to upload registrations to. Click the Registrations tab, then select Bulk Upload from the top-right menu. The upload modal will open.
Drag and drop your .csv file into the upload area, or click Browse to select it. The system will automatically detect and map your columns. Review the column mapping to confirm it is correct, then click Continue.
The system will validate every row before importing. Any rows with issues will be flagged with a reason. Common errors include:
- Duplicate email – the address already exists for this event
- Invalid email format – the email address is malformed
- Invalid phone number – required if WhatsApp delivery is selected
- Capacity exceeded – the upload would take the event over its maximum
You can download a report of failed rows, correct them, and re-upload. Valid rows will still be imported even if some fail.
Once you are happy, click Import [N] Records. A progress bar will show as records are created. When complete, the Registrations tab will refresh showing all newly added entries with a status of Not Yet Invited.
Sending Invitations & QR Codes
Dispatch parking passes to registrants via email or WhatsApp, each containing a unique QR code.
Park Me Up supports two delivery channels for parking passes:
- Email – A branded email is sent containing the parking pass with QR code as an attachment or embedded link.
- WhatsApp – A message is sent via Twilio containing a link to the pass and a QR code image. Requires a valid mobile number in international format.
From the Registrations tab of an event, click Send Invitations. You will see a summary of how many registrants have not yet been invited. Select your preferred delivery channel, then click Send All.
To send or resend an invitation to a single registrant, locate them in the Registrations list and click the ⋮ options menu next to their name. Select Send Invitation. This is useful for re-issuing passes to people who did not receive the original message.
The pass holder receives a message containing:
- The event name, date, and time
- Their allocated parking zone and any entry instructions
- A unique QR code linked to their registration
- A link to view and save their pass on their phone
For delegate passes (where no plate was provided), the pass holder is also given a secure link to register their vehicle plate before arriving.
Each registrant in the list displays an invitation status badge:
Not Invited– invitation has not yet been sentSent– the invitation has been dispatchedDelivered– confirmed delivered (WhatsApp only)Plate Registered– the delegate has submitted their plate
Failed. You can correct the phone number and resend, or switch to email delivery for that individual.Check-in & Check-out on the Day
Scan QR codes at the barrier, monitor live occupancy, and handle gate exceptions in real time.
On a smartphone or tablet at the gate, open the Park Me Up app and navigate to Scan. Select the relevant event from the dropdown. Point the camera at a pass holder's QR code to check them in.
After scanning, the device will display one of the following results:
| Result | Colour | Meaning |
|---|---|---|
| Approved | 🟢 Green | Valid pass — entry permitted |
| Already Checked In | 🟡 Amber | Pass used previously — verify with holder |
| Not Found | 🔴 Red | QR code not recognised — do not admit |
| Wrong Event | 🔴 Red | Pass is for a different event or date |
| Revoked | 🔴 Red | Pass has been cancelled by an admin |
From any admin device, open the event and select the Live View tab. This shows real-time occupancy by zone, a running count of checked-in vehicles, and a list of the most recent check-ins. This screen updates automatically — no refresh required.
If a pass holder cannot display their QR code (e.g. dead phone battery), search for them by name or vehicle registration in the Registrations tab. Click their record and select Manual Check-in. Enter your admin PIN to confirm.
Check-out scanning works the same as check-in — the system automatically determines whether a scan is an entry or exit based on the vehicle's current status. After the event, use Export Report from the event page to download a full log of all entries, exits, and manual overrides.
Managing Individual Passes
Edit, transfer, revoke, or reissue passes for individual registrations as circumstances change.
Open the relevant event and go to the Registrations tab. Use the search bar to find a pass holder by name, email address, or vehicle registration. Click on their row to open the individual pass record.
From the pass record, click Edit to update the following fields:
- Name or contact details
- Vehicle registration plate
- Allocated parking zone
- Delivery preference (email / WhatsApp)
After saving, the pass is updated immediately. If the pass has already been sent, the updated details will be reflected on the pass holder's link — they do not need to be re-invited unless the QR code itself needs to be reissued.
If a pass needs to be transferred to a different person (e.g. a colleague is attending instead), open the pass record and select Transfer Pass. Enter the new pass holder's name, email, and phone number. The original pass will be invalidated and a new one issued to the new recipient.
To cancel a pass (e.g. the holder is no longer attending), open the pass record and click Revoke Pass. Enter a brief reason for your records, then confirm. The pass will immediately show as Revoked and will be rejected at the gate scanner.
If a pass holder loses their QR code or cannot locate their original message, click Reissue Pass from their record. A new QR code is generated (the old one is invalidated) and the updated pass is dispatched via their preferred delivery method.
Admin & Settings
Manage admin user accounts, notification preferences, integrations, and security settings.
Navigate to Settings → Admin Users to view all users with access to the dashboard. From here you can:
- Invite a new admin by entering their email address
- Assign a role:
Admin,Security Supervisor,Security Staff, orShowcase Backend - Remove or deactivate an existing user's access
- Reset a user's password or require them to re-authenticate
| Permission | Admin | Security Supervisor | Security Staff | Showcase Backend |
|---|---|---|---|---|
| View Dashboard | ✅ | ✅ | ✅ | ✅ |
| View Registrations | ✅ | ✅ | ✅ | ✅ |
| Create Registrations | ✅ | ✅ | ❌ | ❌ |
| Edit Registrations | ✅ | ✅ | ❌ | ❌ |
| Delete Registrations | ✅ | ✅ | ❌ | ❌ |
| Check In Vehicles | ✅ | ✅ | ✅ | ❌ |
| Manage Invitations | ✅ | ✅ | ❌ | ❌ |
| View Reports | ✅ | ✅ | ✅ | ❌ |
| Manage Events | ✅ | ❌ | ❌ | ❌ |
| Manage Parking Areas | ✅ | ❌ | ❌ | ❌ |
| Manage Departments | ✅ | ❌ | ❌ | ❌ |
| Manage Attendants | ✅ | ✅ | ❌ | ❌ |
| Manage FAQs | ✅ | ❌ | ❌ | ❌ |
| Manage Email Templates | ✅ | ❌ | ❌ | ❌ |
| Manage Seasons | ✅ | ❌ | ❌ | ❌ |
| Manage Payment Terminals | ✅ | ❌ | ❌ | ❌ |
| View Activity Logs | ✅ | ❌ | ❌ | ❌ |
| Manage Users | ✅ | ❌ | ❌ | ❌ |
| Manage Roles | ✅ | ❌ | ❌ | ❌ |
| Manage Settings | ✅ | ❌ | ❌ | ❌ |
| Read-Only Showcase Mode | ❌ | ❌ | ❌ | ✅ |
2FA is enabled by default for all Admin accounts. When logging in, admins receive a one-time code via SMS to their registered mobile number. To update the 2FA phone number for an account, go to Settings → My Account → Security.